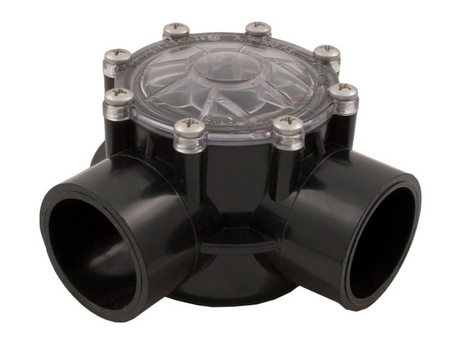
PVC Fittings Online

  • How Long Do Pool Filter Cartridges Last?

    Swimming pools are a ton of fun, but they're also a lot of work to clean and maintain. Luckily, thanks to pool pumps and filters, you don't have to do all the work and scrubbing yourself. Pool filter cartridges remove dirt and debris from your pool water as it recirculates through the filter via the pump. 

    However, pool filter cartridges see a lot of use and abuse and have limited lifespans. On average, pool filter cartridges last for one to two years, depending on how heavily you use your pool. With proper maintenance, a filter cartridge can even last up to three years!

    If you want to know more about pool filter cartridges and how to get the most use out of them, you've come to the right place. This article will examine how different things affect pool filters, maintenance tips, and tricks, and where to get the longest-lasting filters on the market. We'll also explain how to know when it's time to replace your filter with a new one. 


    What Exactly Does a Pool Filter Do?

    A pool filter works exactly like an air filter on a furnace, fan, or air conditioner. It works together with your pump filter to clean the water in your pool and to keep it that way. Here's what happens: 

    • Your pump turns on and draws water towards it.
    • Before water reaches the pump, it passes through your filter, which removes debris, dirt, and other particles.
    • The pump then pushes the water back into your pool.
    • This process repeats for as long as the pump is running, which means your water is constantly recirculating.


    Different Types of Pool Filters

    While all pool filters work by the same premise, there are different types that filter things differently. 

    Cartridge Filters

    Cartridge filters are the most common and effective types of pool filters. These filters contain pleated polyester material that traps particles as they pass through them. Cartridge filters are some of the lowest maintenance and longest-lasting filters on the market, as the cartridges themselves can last up to ten years, while each filter lasts two to three. Cartridge filters are also more affordable than their glass and sand alternatives. 

    Glass Filters

    Glass filters are very similar to sand and cartridge filters in how they operate. Rather than having pleated polyester, however, glass filters have a glass media. They can last for up to five years and are some of the most effective but expensive filters on the market. 

    Sand Filters

    Finally, you can also choose sand filters for your pool. Sand filters use a layer of sand to trap and remove debris and other unwanted particles from water. Sand filters can last up to ten years, while the tank that holds the sand can last up to 15 or 20 years. 


    Things That Put Your Pool Filter at Risk

    There are a number of things that can put your pool filter at risk and speed up its demise. In most cases, these risks are chemicals that you use to clean the pool, or that accidentally spill into it. 

    • Using too much chlorine during cleanings
    • Oil and petroleum products
    • Suntan or body lotion
    • Perfume
    • Using the wrong type of chlorine or impure chlorine


    Signs You Need to Replace Your Pool Filter

    The number of years a pool filter can last is simply an average and a rough estimate. Therefore, it's important to know what signs to watch out for that indicate your filter is nearing the end of its lifespan. 

    Frays and Tears

    Frays and tears in your filter cartridge are the most obvious signs that you should replace your filter. Frays and tears happen from repeated use when objects are constantly passing through the filtration material. 

    Crushed Pleats

    In addition to frays and tears, crushed or flattened pleats are another common sign of filter wear. 

    An Obviously Dirty Pool

    Your pool filters one and only job is to clean your pool water. Therefore, if your water is obviously dirty or discolored, your filter isn't doing its job. As such, you should replace it with a new one so that you can once again have clean pool water. 

    High Filter Pressure

    As water gets pumped through your filter cartridge, its exit velocity shouldn't be too different than when it entered. However, if your filter is dirty, water will have a difficult time passing through it and come out more forcefully than it should. Therefore, you can check your water's exit velocity from the filter to see if your filter is dirty or not. 


    Pool Filter Maintenance Best Practices

    If you want to get the most life out of your filter, proper maintenance is essential. Here are some things to remember. 

    Clean Your Filter Regularly

    In the same way that your filter is responsible for cleaning your pool, you're responsible for cleaning your filter. Remove and check your filter every other week for debris and buildup, and use a garden hose to wash it when necessary. It's also good to soak the filter in a cleaning solution made specifically for cartridge filters periodically. 

    Don't Run the Filter Non-Stop

    Most people mistakenly believe that you should run your filter non-stop. However, running your filter around the clock for no reason will only speed up its demise. Instead, hire a pool technician to help you understand when you should run your filter, how long you should run it, and at what speed. That way, your pool filter will do the maximum amount of good with the minimum amount of effort. 

    Don't Make Your Filter Do All the Work

    While your pool filter is the main agent when it comes to keeping your pool clean, it isn't the only one. You can ease the stress and strain on your filter by using your skimmer and chlorine correctly. Better yet, hire a pool cleaning professional to clean your pool every week or every other week. 

    Choose a High-Quality Cartridge Filter

    In addition to pool filter maintenance, you can get the most life out of your filter by purchasing high-quality ones. Unicell pool filters from PVC Fittings Online are some of the best and longest-lasting on the market. Rather than base their longevity on years, Unicell filters last for twelve to fifteen cleanings, which can be up to three years. 

  • Aftermarket or OEM Pool Filters: Which One to Use?

    If you're lucky enough to have an above-ground or in-ground pool at your home, it's important to properly care for and maintain it. While there are many practices and factors that go into pool maintenance, the type of pool filter you use is one of the most important. When it comes to pool filters, there are two basic types available: aftermarket and OEM. 

    OEM (original) pool filters and cartridges are considered the better option between the two, but they're also more expensive. Aftermarket pool filters, while being more affordable, may not last as long or do as good of a job as an OEM filter. There's also a chance that an aftermarket brand isn't compatible with your pool. 

    If you know you need a new pool filter but aren't sure which option is right for you, you've come to the right place. This article will explain the difference between aftermarket and OEM pool parts and filters and how to decide which option is right for you. Let's "dive" in! 


    What Are OEM Pool Parts?

    OEM stands for original equipment manufacturer and refers to the parts that originally came with your pool. In the case of your pool filter cartridge, the OEM filter is whatever the pool professional installed for you when you first purchased your pool.

    On average, pool filter cartridges last for three to four years, but they can give out sooner depending on how much you use your pool. Traditionally, when cartridge filters needed to be replaced, the only option was to go back to the original manufacturer and purchase a replacement filter.


    What Are Aftermarket Pool Parts?

    aftermarket pool equipment refers to any pool filters and replacement parts that are not the same as your original brand. For instance, if you had a Polaris filter cartridge originally installed on your pool, aftermarket filter cartridges would be any filters other than Polaris.

    Also referred to as aftermarket parts, aftermarket filters, and pool parts sometimes have an unwarranted reputation as not being as good as their OEM counterparts. However, as long as the aftermarket products you choose are high-quality and compatible with your pool and cleaner, they'll get the job done.


    What's the Difference Between OEM and Aftermarket Pool Parts?

    While both OEM and aftermarket pool filter cartridges perform the same task and get installed the same way, there are a few differences you should know about.

    Warranty

    Warranty coverage is something that all pool owners should consider when replacing their pool filter cartridges. If something goes wrong with your filter and it gets damaged or causes damage to another part of your pool, such as the pump, it likely won't be covered by warranty if you were using an aftermarket filter. If you're using an OEM part, however, the damage may be covered under warranty.

    Price

    While warranty coverage is a good reason to buy OEM, price is typically a good reason to buy aftermarket. OEM filter cartridges and parts can cost two or three times as much as their aftermarket counterparts. This is because major manufacturers have had a monopoly on the pool industry for so long and are used to being able to charge whatever they want.

    However, as aftermarket parts are gaining in popularity, OEM prices have come down slightly but are still much higher than aftermarket ones.

    Material and Bands

    While price and warranty information are important, it's more important to consider the quality of the filter cartridges themselves. Quality often comes down to two factors - the material of the filter and the band count.

    The band count refers to the bands that wrap around the entire length of the pool filters. They keep the filter pleats from moving around while they're filtering your water, and the more bands you have, the more stable the pleats will be. Therefore, if you choose an aftermarket brand, make sure it has enough bands to get the job done.

    When it comes to the actual material of the pool filters, there are several options to choose from. A combination of microfiber and either polyester or nylon mesh are the best materials for pool filters. As long as the aftermarket filter you choose has this combination of materials, you shouldn't have anything to worry about.

    Durability and Filtration Performance

    Finally, it's also important to consider durability and overall performance when comparing OEM and original pool filter cartridges. In general, as long as aftermarket filters are the same size and have high-quality bands and materials, they will perform as well as OEM parts for a fraction of the price. They will last just as long, too!


    Are OEM or aftermarket Parts Right For Me?

    In general, it's always safer to choose original pool parts if you're on the fence about which parts to choose. OEM parts that are exactly the same as those you're replacing will certainly be compatible and work with your pool. However, if you talk with a pool parts professional and they assure you that certain aftermarket parts are ok for your situation, you can use aftermarket parts. 

    Another option is to choose aftermarket replacement pool filter cartridges that are high-quality and work with any system and filter housing. If you prefer to go this route, consider choosing a Unicell pool cartridge filter from PVC Fittings Online. Unicell makes some of the finest replacement filter cartridges in the industry that are just as good, if not better, than your OEM cartridges.


    Factors to Consider When Choosing Aftermarket Pool Parts 

    If you're leaning towards buying aftermarket pool parts, such as a Unicell pool filter cartridge, here are a few factors to consider before making your purchase.

    •Do your homework on the brand in question and make sure they are a reliable distributor.
    •Check Google reviews on the brand in question to see how their products are performing.
    •Make sure the parts you choose are the same size as the parts you're replacing.
    •Beware of aftermarket brands attempting to pawn their products off as original when they're knock-offs.

    As long as you keep these things in mind when you're purchasing aftermarket replacement filter cartridges, you are good to go. 

  • How to Connect a Camlock Fitting to PVC Piping

    Whether you're a plumber, a homeowner doing your own plumbing, or otherwise working with PVC, camlock fittings are your best friend. Camlock hose fittings are special plumbing components that are ideal for attaching PVC pipe to other pipe materials.

    There are many different types of female and male camlock fittings, including those made of aluminum, stainless steel, brass, and more. There are even polypropylene camlock fittings, which are some of the most commonly used in the industry. Each of these various fittings gets connected to PVC differently, depending on the material.

    If you're curious and want to know more about camlock fittings and how they connect to PVC, you've come to the right place. This article will also look at the different types of camlock fittings and how to choose the one that's right for you.


    What are Camlock Fittings?

    Also referred to as cam and groove couplings, camlock fittings are used to connect two different piping materials together. These types of fittings typically consist of a coupler on one side and a grooved end on the other. Cam and groove couplings can also be used to attach two halves of the same material together. It all depends on your needs.

    In addition to being very versatile, camlock fittings are also easy to use and require no tools for installation. They also don't require any special preparation, such as glue or Teflon tape, and can be readily used in any environment. As such, they're the most popular type of coupler in the world and are used in many different industries.


    Different Types of Camlock Fittings

    As we said before, there are many different types of camlock fittings. They can be made of brass, aluminum, stainless steel, polypropylene, and nylon, to name the most common options. In addition to there being different material options, there are also different types of fittings based on your needs.

    Type A - Male Adapter With Female Thread

    Also known as a male camlock X, this type of fitting has a male end that fits into the female end of another camlock fitting and a female end with threaded ends.

    Type B - Female Coupler With Male Thread

    Also known as a female NPT camlock, this type of fitting has a female end that attaches to a male camlock X fitting, and a male threaded end.

    Type C - Coupler With Hose Tail

    This type of camlock fitting has a female end that attaches to a male camlock X and a male hose barb end that attaches to a hose fitting.

    Type D - Coupler With Female Thread

    This type of camlock fitting has a female end that attaches to a male camlock X and a female threaded side that attaches to a male thread.

    Type E - Adapter With Hose Tail

    This type of fitting has a male end that fits into the female end of another camlock fitting and a male hose barb end that attaches to a hose fitting.

    Type F - Adapter With Male Thread

    This type of fitting has a male end that fits into the female end of another camlock fitting and a male threaded side that screws into a female threaded end.

    Type DC - Dust Cap For Adapter

    This type of fitting is a dust cap that fits over the top of the male end of a camlock fitting to seal it off.

    Type DP - Dust Plug For Coupler

    This type of fitting is a dust plug with a male camlock end that fits into the end of a female coupler.


    Different Components of a Camlock Fitting

    As you can see, there are many different types and styles of camlock fittings. However, every fitting consists of two or three basic parts, including the following.

    Male Adapter 

    The first crucial part of a camlock fitting is the male adapter. The male end of the camlock coupling will either fit inside of a female camlock end or have threads so that you can screw it into the female end of your PVC pipe adapter. If it has threads, it's known as the cam groove end.

    Female Coupler

    The second part of any camlock fitting is the female coupler end. The female end will either fit around a male camlock end and fasten to it or have threaded grooves that attach to a PVC male adapter on a PVC pipe. In the case of metal pipe, the camlock will be made of metal and the threaded end will attach to a metal pipe fitting.

    Can Arms 

    Finally, you have cam arms, also known as cam levers, that are used to tighten the female cam fitting to the male end. Cam arms are only included on fittings with a female NPT camlock end.


    Which Camlock Fitting is Right For Me? 

    The nice part about camlock fittings is that it's fairly easy to determine which fitting is right for you as long as you follow these two steps. First, match the material of the camlock fitting with the material of whatever you're attaching to. Next, choose a fitting that has the ends and connectors you need to make a solid connection.


    How to Connect My Camlock Fitting to PVC Pipe 

    Now that you know the different types of camlock fittings and how to choose the one you need, let's look at how to connect camlock to PVC pipe.

    1. Start by gluing a male adapter onto the end of your PVC pipe. The male adapter will have a female end that goes around the outside of the pipe and a threaded male end.
    2. Next, select a Type A nylon or polypropylene camlock fitting.
    3. Screw the female end of the camlock onto the male end of the PVC adapter.
    4. Wrap Teflon tape around male end of the PVC adapter before screwing the female NPT camlock onto it.
    5. Next, select the right female NPT camlock fitting for your needs.
    6. To attach the female camlock to the male camlock, simply slide the female end over the male end.
    7. With the male end fully inserted, pull the cam handles down to lock the fittings in place.
    8. Remove the small pin from the cam handle and insert it into the hole just below the handle to lock the handle in place.

    By following these steps, you'll create a leak proof seal while connecting to PVC pipe. If you're not sure which type of camlock fitting is right for you, the pros at PVC Fittings Online can help! 

  • The Effects of Hard Water on Your Pipes

    Thanks to the Internet, most people know about the potential dangers of hard water. The minerals and contaminants in hard water dry out your skin, are bad for your hair, and are unhealthy to ingest. However, did you know that hard water also wreaks havoc on your plumbing pipes?

    Minerals, including magnesium, calcium, and copper, all of which are beneficial in certain situations, are terrible for your plumbing pipes and system. They can corrode your pipes from the inside out, resulting in leaks, dirty water, contaminated drinking water, and more.

    To find out more about how and why hard water is bad for your plumbing pipes, keep reading. We'll also discuss what you need to do to ensure that hard water doesn't damage your pipes and things you can do to avoid it.

    What Exactly is Hard Water?

    Hard water doesn't mean that your water feels physically hard. Instead, it refers to the ingredients within your water, which can make it feel soft or hard. In its natural state as rain, water is naturally soft. However, as it falls through the atmosphere and after it falls onto the ground, rain becomes hard, thanks to the minerals and contaminants it combines with.

    While calcium, magnesium, and copper are the main culprits, manganese, iron, zinc, barium, aluminum, and others can make soft water hard.

    How to Tell if You Have Hard Water

    As a general rule, unless you have a water softener installed in your home or business, you have hard water. Most water sources, including city and well water, naturally have minerals and other contaminants in them. Therefore, unless you do something to soften it actively, the water will be hard.

    To double-check whether or not you have hard water, however, here's what you can do.

    •Check your hands and skin after showering or washing your hands and check for dryness and residue.
    •You have itchy and dry hair or skin.
    •Dirty water is coming out of your faucets.
    •Your dishes have spots on them, even after a thorough washing and drying.


    While each of these are signs of hard water, the best way to test the softness of your water is with a hard water test. Here's how it works:

    1. Purchase a hard water test kit.
    2. The kit will contain test strips that you dip in your water and remove.
    3. If the test strip reveals a high "water hardness score," you have hard water.
    4. Hard water test strips typically use a color or numerical system to indicate how hard your water is.
    5. Follow the directions on your specific tests to know your results.


    How Does Hard Water Damage Your Plumbing Pipes?

    Now that you know more about what hard water is and what it contains, let's look at how it affects your plumbing pipes.

    Rust and Corrosion

    The main way that hard water affects your pipes is by causing rust and corrosion. This is especially true with older plumbing pipes that are made of cast iron, steel, and metal. The minerals and contaminants in hard water eat away at the inside of the pipes and cause them to rust from the inside out. This, in turn, leads to many of the other problems common with hard water.

    Premature Breakdown and Leaks

    As hard water eats away at your plumbing pipes from the inside out, it causes them to break down. In addition to eating away at the insides of the pipes, hard water also eats away at the threads and seams where your pipes connect. Once these parts start corroding, it can lead to water leaks, which creates more corrosion and complicates the problem.

    Slow Water Flow

    As your plumbing pipes are breaking down from the inside out, small pieces of the pipe break away and get lodged on the inside of the pipe. This can slow down the flow of water as it travels to its destination.

    Clogged Pipes

    When enough of the pipe breaks down and gets stuck to the insides of the pipe, it can get completely clogged. When this happens, you will need to either repair or replace the damaged part of the system or the entire system. This is the worst-case scenario in terms of how hard water affects your plumbing pipes.

    Higher Water Bills

    The harder that water has to work to make it to its destination, the harder your water pump will work to get it there. When this happens, you will have higher water bills, especially when you factor in leaks and potential repairs.

    Water Heater and Other Appliances

    In addition to damaging your water pipes, hard water hurts other parts of your plumbing system. The most common of these problems is that it will significantly shorten the lifespan of your water heater. If your water is hard enough, it can also cause irreparable damage to your washing machine, dishwasher, toilets, and other appliances.


    Can I Fix the Damages That Hard Water Causes?

    If hard water damages your plumbing pipes, you have two options. First, you can either make temporary repairs and fix clogs, leaks, and other issues. Or, you can upgrade your plumbing pipes to those that are immune to the effects of hard water. These pipes include PVC, CPVC, and Pex pipes because they don't have metal or iron inside of them. As such, hard water flows through them seamlessly without causing any issues or breakdowns.


    How to Make My Water Softer

    If you don't want to upgrade your entire plumbing system and replace all your pipes, you also have the option of addressing the problem directly - hard water. Several options include boiling your water to remove contaminants or installing a water filter to get rid of some of the contaminants.

    However, the best way to make your water softer is by installing a whole-house water softener. Water softeners use a variety of methods, including ion exchange, salt, or even electricity, to soften water.

    They do this by having hard water pass through them so they can filter out minerals and contaminants. When these minerals and contaminants are removed, the water is no longer hard and poses no threat to your plumbing pipes, appliances, or health.

  • DIY PVC Birdhouse

    Birdhouses are more than just quaint additions to your garden. They provide essential shelter for birds and offer a unique opportunity to observe wildlife up close. Read this step-by-step guide on how to create your own birdhouse using PVC pipe and other material from around your home!

    Designing the Birdhouse

    We took the time to create a birdhouse of our own design, but bird enthusiasts may notice one major feature that was intentionally excluded. Our birdhouse does not contain a perch. The Alaska Department of Fish and Game encourages people to avoid adding perches as they allow predators “better access to the eggs and young in the nest box”. This is not a guide on how to take care of birds, but we want to do our part to encourage safe wildlife practices. 

    Supplies

    Tools

    • Drill
    • Hacksaw
    • Cross cut Saw
    • Measuring tape
    • Pencil/Pen/Marker
    • Hole Saw bit

    Materials

    • 1 - 8 inches of 4" PVC Pipe (4" diameter)
    • 3 - 8” x 8” Wood squares
    • 1 - Epoxy
    • 1 - Exterior/Outdoor use Spray Paint
    • 1 - Clear Gloss Spray
    • 1 - File
    • 1 - Medium grit sandpaper
    • 1 - Eye Hook (screw or bolt)


    Step by Step Guide

    Preparing the Body 

    Step 1: Prepare the PVC Pipe

    Measure and cut 4” PVC pipe to roughly 8 inches in length with a hacksaw. We did most of the cutting with a hacksaw, which worked well, and finished with a crosscut saw. A circular saw will also work fine. 
    Tip: We suggest getting a longer PVC pipe and cutting it down to the appropriate length. This lets you have more room for errors and potentially enough PVC pipe left over for another project!

    Step 2: Roof Cuts on the PVC Pipe 

     For our gable roof, which looks like an upside down “v” shape,  2 mirrored cuts are made at 45° angle. Measure and mark your intended cut path on the PVC pipe using a pencil or marker. Then use a hacksaw to make your cut(s). Next, use a file to shave down any areas that may not be even.

    We encourage beginners to instead do a shed roof. This only requires 1 wood square and 1 angled cut on the PVC body  between 30° and 50°. 


    Step 3:  Add an Entrance Hole

    A standard size of an entrance hole for small birds is 1 1⁄2 inches in diameter. The hole size is dependent upon the type of bird you want to attract. Mark the entrance hole on the PVC pipe just below the roof. Use a hole saw bit and drill to cut out the entrance hole.
    Tip: Check the edges after cutting the hole. Use a file to smooth any sharp edges! Also, use resources such as this Birdhouse Size Requirements resource from the Ogden Nature Center to decide the entrance hole size you will need.


    Step 4: Sand the PVC Pipe.

    First, use a file to remove any sharp edges on areas cut in previous steps. Next, sand the entire outside of the PVC pipe. Scuffing the exterior will help with the adhesion of the paint. Use medium grit sandpaper during this process.


    Step 5: Paint and Protect the PVC Pipe 

    Paint the PVC pipe with your chosen color, and sure whatever paint you use is meant for outdoor use. Allow some time for it to dry. Next, add clear gloss for protection. Let the gloss dry completely before moving on!

    Preparing the Roof and Base

    Step 6: Cut Wood Squares for Roof and Base

    For the gable roof and base, cut 3 wood squares:

    • One 6’’ square piece for the base
    • Two 5” x  8’’ pieces for the roof

    The roof must extend over the entrance hole by roughly 2 inches to provide proper cover. Each piece of wood used for the gable roof should have 1 side cut at a 45° angle. That will be important to get the “v” shape. After adhering the wood pieces together at the 45° sides, it should be close to ~90°.

    Going the beginner route with a shed roof? No angle cuts needed! You just need one 10’’ square piece of wood for the roof and one 6” wood square for the base.

    Tip: Test the edges of all your angle cuts by placing the wood roof squares on top of the PVC body. The sides of the cut pipe should be relatively flat but do not need to be completely perfect. A few minor bumps and gaps will be good for ventilation but feel free to use your file to create a more perfect fit. 


    Step 7: Epoxy Roof Squares Together

    Use a quick setting epoxy to adhere the cut wood squares together to form the roof. We added a light coat of epoxy to the 45° angled edges and firmly held the pieces together. Once the epoxy is set, allow it to cure for the recommended amount of time.

    Tip: Epoxy should be used outside or in a well-ventilated area. We also recommend using a face mask to avoid inhalation of fumes. 


    (Optional) Step 8: Paint and Coat Wood

    Lightly sand the wood, paint/stain with a color of your choice, let it dry, then add a coat of clear gloss, then let it dry.


    Step 9: Place the Eye Hook

    Find the center of the roof ridge. File a small area until flat. Drill a pilot hole, then place or screw in an eye hook. If using an eye hook bolt, screw a nut on the underside of the roof to secure it.


    Assembly - Putting it all together  

    Step 10: Adhere Base and Roof

    Spread epoxy to the base where you intend to place the bottom of the PVC body. Then, place the PVC pipe on the wooden base and apply pressure until it sets. Adhere the roof similarly by spreading epoxy along the cut edges of the PVC pipe and placing the roof centered on the epoxied areas. Apply pressure until it sets and allow for the appropriate amount of time for the epoxy to cure.

    Tip: You only have a few moments to recenter the roof if it looks off so double check and move fast! 


    Step 11: Add String/Wire and Find a Good Branch

    Loop a string or wire through the eye hook and find a good place to hang your new birdhouse!


    Create Your Own

    Viola, you’re done! Not only do you get the satisfaction of building with your hands, but you have created a potential safe haven for the birds in your community. This project showcases how simple materials like PVC pipe, with a touch of creativity, can result in a functional habitat. Looking for more outdoor DIY projects? Check out our guide on how to build your own functional hydroponic garden to pair nicely with your new birdhouse! 


    ***follow our blog to learn more about our next project: DIY Bird Feeder! 

  • How to Install a Well Water Pressure Tank

    Well Pressure Tank

    Well water pressure tanks are very valuable commodities for a modern plumbing system. They ensure that water flows evenly and steadily throughout your home at all times. However, these pressure tanks get put under a ton of stress and pressure, and will usually need to be replaced every five to seven years. When the time comes, you can save a lot of money by installing your own well pressure tank.

    To replace your old well pressure tank and install a new one, you'll first have to get the old one out of the way. Next, remove the water line from the old tank and connect it to the bottom of the new one. After you set your new tank into place, you can reconnect the water line on the bottom of the tank to the water line, and you're good to go.

    Installing a well pressure tank isn't overly difficult, but it's important to be meticulous and precise. You should also take precautions to stay safe during the process because you will be working with water and electricity simultaneously, which can be dangerous. However, as long as you follow the instructions and advice in this article and your jurisdiction's codes, you should have no trouble installing your own well pressure tank.
    Continue reading

  • How to Use a PVC Pipe Cutter Tool

    PVC Pipe Cutting Tool

    If you're a homeowner or new plumber and you're looking for the right tools to cut PVC pipe, look no further than a PVC pipe cutter. PVC pipe cutters are specifically made to cut PVC, CPVC & various types of plastic pipe. However, while they seem straightforward and easy to use, there's a trick to using certain types of PVC pipe cutters.

    There will be different instructions for each pipe cutter, depending on the type of cutter you choose. In general, however, the key is to mark the spot on the pipe where you want to make your cut. Next, tighten the jaws of the cutter around the pipe so that the cutter blade is on your mark. Once you're ready, either squeeze or rotate the pipe cutter until the blade slices through your pipe.

    If you're curious and want to know more about the different types of pipe cutters and how to use them, you've come to the right place.
    Continue reading

  • Can You Use PVC Fittings with CPVC Pipe?

    PVC and CPVC

    If you're a plumber or enjoy DIY projects, it's essential to understand the different products and materials you're working with. For instance, it's common with plumbing projects to run into situations where you must combine different materials. One of these most frequent occurrences is when you need to use PVC fittings with CPVC pipe. However, this begs the question of whether you can combine these two materials.

    Although PVC and CPVC are two different types of pipe, they're similar enough that for non-pressure applications, PVC fittings are compatible with CPVC pipe. However, it's essential to use the correct type of glue or cement and to use pipe and fittings that are compatible in size. Otherwise, you risk damaging your pipe and fittings, and the two materials won't be compatible.
    Continue reading

  • How to Properly Pressure Test PVC Pipe

    Leaky PVC Pipe

    If you're a novice plumber who has just completed their first plumbing project, you probably think your job is done. You've installed all the vents, drains, and water lines, and everything looks great! However, the job isn't finished until you perform a pressure test on your piping to ensure there are no leaks.

    Pressure tests for PVC piping systems are generally mandatory to pass a plumbing inspection. They're the only way to ensure your pipes won't leak or burst when full of water. Pressure testing requirements vary by a multitude of factors, such as state, county, and city, so it’s essential you ensure you’re up to code wherever your project is located.

    While pressure testing your plumbing system sounds simple, it's a somewhat complicated procedure, especially for newbies. However, regardless of how inconvenient or difficult it is, pressure testing your PVC pipes is essential to have peace of mind and avoid future plumbing problems.
    Continue reading

  • Can You Use Plumbing PVC For Electrical Conduit?

    Electrical Conduit

    If you're a homeowner with a DIY knack, it's common to run into situations where you're tempted to use products for reasons outside their intended purpose. For instance, let's say you need a piece of electrical conduit and you have an old PVC pipe lying around. Can you use it as an electrical conduit?

    While PVC pipe and traditional electrical conduit look and feel similar, you should never use plumbing PVC for electrical conduit. Plumbing PVC is designed to work within plumbing systems for drains, sewers, and vents, whereas electrical conduit PVC is designed for electrical use. You shouldn't use them interchangeably in any capacity.

    If you're considering using plumbing PVC for electrical conduit but want to know if it's safe, you've come to the right place. This article will explore the similarities and differences between the two types of PVC pipe and explain why they aren't interchangeable. We'll also examine the potential consequences of using plumbing PVC for electrical conduits.
    Continue reading

Items 1 to 10 of 243 total

Page:
  1. 1
  2. 2
  3. 3
  4. 4
  5. 5
  6. ...
  7. 25