Do you have a green thumb and are looking to try something new? Just getting started with gardening and want to give hydroponics a shot? You’re in the right place! We will show you how to build your own hydroponics system, or hydroponic garden, using PVC piping.
If you’re not familiar, using a hydroponics system, or hydroponics farming, is an agricultural practice without the use of soil. Think of it like growing plants without planting them in the ground. Sounds enticing, doesn’t it?
Find below the materials and steps you need to make this DIY hydroponics system with PVC pipe:
Materials Needed
- (4) 2” PVC Pipe in 5ft lengths
- (8) 2” PVC 90 Degree Elbows
- (1) 2” PVC Flat End Cap
- Solvent Cement & Primer
- Large Storage Tub – (Not transparent)
- Hose Pipe (approximately 5ft, will depend on your set up)
- 2 Pallets (or build a frame)
- Plastic Cups (about 27)
- Drill
- Marker
- Saw (Dremel, jig saw, or drill with hole bit)
- Tape Measure
- Small Water Feature Pump
Steps for the DIY Hydroponics System
Step 1: Cutting the Pipe. Take 3 of the 5ft lengths and cut 4 inches off one end of the pipe. These will be used to connect the 90 degree elbows.
Step 2: Cutting Out the Cup Holes. Take one of the plastic cups, cut it in half. This will tell you how big the cup holes need to be. Next, you’ll take the smaller end of the cup and trace it onto the PVC pipe. To do this, first measure about 2-3 inches from the end and then trace the first circle. Be sure to leave about 3 inches between each cup. You’ll have enough space for about 6-8 cups on each pipe.
After you’ve traced and measured the holes, use a drill with a hole bit the size you need to cut the holes. A jig saw, a Dremel, or similar cutting tools also do a great job.
Step 3: Assembly. First, do a dry fit of the pipe and elbow fittings to get an idea of how it will look once complete.
Take one 90 degree elbow and insert a 56” piece of pipe to an end of the elbow so that the open end of the elbow is pointing upwards.
At the other end of the pipe, slip on another 90 degree elbow. Insert one of the 4” long pieces of pipe into the open end of that elbow. On the open end of the 4” long pipe, slip on a 90 degree elbow so that the open end of the elbow points back towards the side where you started then insert a 56” pipe.
At the end of this second pipe, slip on another 90 degree elbow. Insert one of the 4” long pieces of pipe into the open end of the elbow. On the open end of the 4” long pipe, slip on a 90 degree elbow so that the open end of the elbow points back towards the other side then insert a 56” pipe.
At the end of the pipe, slip on another 90 degree elbow. Insert one of the 4” long pieces of pipe into the open end of the elbow. On the open end of the 4” long pipe, slip on a 90 degree elbow so that the open end of the elbow points back towards the other side, then insert a long pipe and end with attaching the remaining elbow.
You should now have a zig-zagging assembly of pipe and elbows.
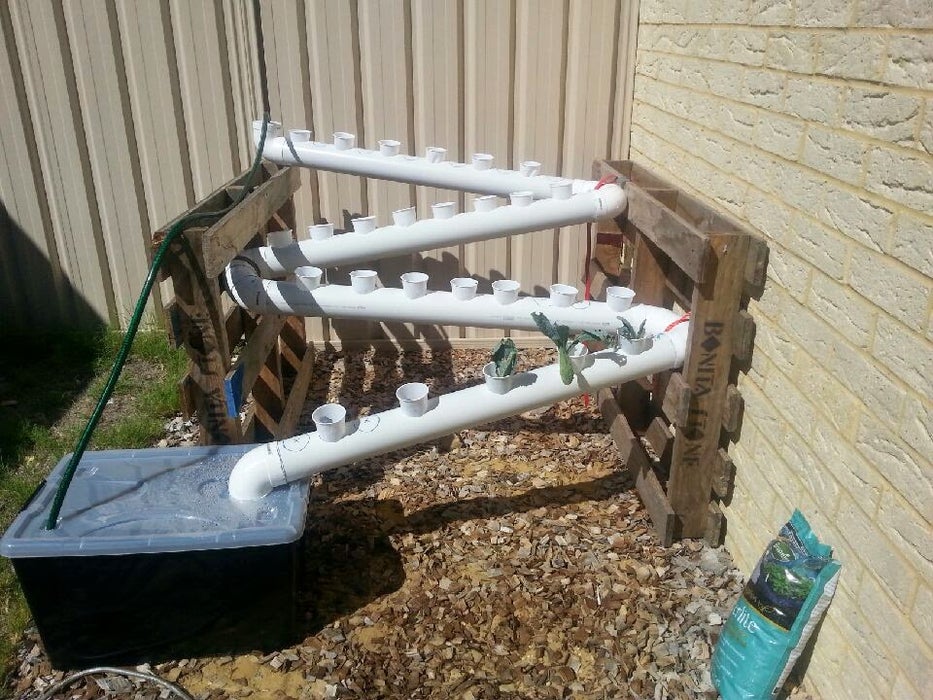
Step 4: Setup Frame. With the dry fit still connected, you should set up your frame. Grab the 2 pallets and set up them so they are vertical and about 4 feet apart. The pallets should be on either side of your piping system, on the ends with the elbows.
After cementing the PVC pieces together, you’ll attach the piping to the pallets. To give you an idea what the end result will look like, temporary affix the piping to the pallets now. One end of the piping system will be the highest point. Then, the piping will run gradually downwards, giving you 3 mid-points that drop a few inches from side to side. Finally, you’ll have your lowest point, which is the opposite end of the highest point. The final elbow on your hydroponics system will point down into the tub with the lid.
As you may not have space to attach the elbow directly to the wood pallet, rope is a good choice and can be adjusted easily if needed.
A helpful tip here will be to make a mark on the elbows and pipe that you can match up when assembling with solvent cement.
Step 5: Cut Hole in Top of the Tub. With the dry fit still in place, trace the elbow that is laying on the tub lid and cut a hole in the tub lid. Cut a smaller hole for the hose on the other end of the lid.
Step 6: Disassemble and Reassemble with Solvent Cement. Follow the steps in Step 3 but use solvent cement each time you are connecting the pipe and fittings. Allow it to dry.
Step 7: Setting Up the Cups. Check the cups to make sure they all fit in each hole. Cut 1-4 holes, or more if needed, to the bottom of each cup so that the plant can get the water needed. Others have cut X’s into the bases of the cups to get the roots in a better placement.
Step 8: Set Up the Water Pump. Place the water pump in the base of the tub. Attached the hose pipe to the pump and feed the pipe out of the tub opening you cut for the hose pipe.
The hose pipe will need to be long enough to reach the top elbow or the beginning of the hydroponics system.
Drill a hole big enough into the flat 2” PVC cap so that the hose is snug but fits into the cap. Don’t cement the flat cap to the top elbow as you may need to remove it or the hose from time to time.
Step 9: Select & Place Plants in Your DIY Hydroponics System. Select the plants you want to grow, and then place them in the cups. Check to make sure all of the roots are hanging into the water stream and watch your plants grow.
Enjoy the Fruits of Your Labor
Now, you can monitor your plant growth and take pride in your DIY hydroponics system. Depending on your plants, you may need to buy plant food and change any nutrients you’re using every 2-3 weeks. In most cases this system is likely outside, so you may need to adjust placement for sunlight. Don’t forget to trim the roots and check the water pH levels often. Most of all, have fun with your new hydroponics hobby!
Is PVC Safe for Gardening, Aquaponics & Hydroponics? Learn more here.